Quantcast
Channel: ProjectWise Design Integration Wiki
Viewing all 1890 articles
Browse latest View live

4 - Register a CONNECTED Project

$
0
0
Current Revision posted to Content Management Wiki by Brian Boyko on 10/4/2017 6:19:09 PM

To register a project with Bentley, the Project Registration utility is used to provide information about a project as well as manage previously registered projects. The CONNECTED Project Registration utility can be accessed by:

  1. Go to https://connect.bentley.com/
  2. Login with your Bentley IMS credentials (the same credentials used to log into BE Communities)
  3. On the Recent projects Tile, Select +New button

4. Fill in the required fields and select "save".  

5. After completing the project registration, select the CONNECT Icon in the upper left hand corner to take you back to the personal  portal.  

6. Select the "My Projects" or the project name from the recent project list.

7. On the project page, select the "ProjectWise Project Mobile" application from the list of application tiles.

See the "Associating on-premise content with the CONNECTED Project" technote for the next steps to take before creating a Share

Tags: ProjectWise Edge Mobile

Review/Markup ProjectWise Documents using ProjectWise Edge Mobile

$
0
0
Revision 1 posted to Content Management Wiki by Dawn Clark Gentry on 10/4/2017 6:39:55 PM


Applies To 
  
 Product(s):ProjectWise Edge Mobile
 Version(s):05.05.11.01
 Environment: iOS 11
 Area: Mobile
 Subarea: N\A
 Original Author:Dawn Gentry, Bentley Technical Support Group

Review/Markup ProjectWise Documents using ProjectWise Edge Mobile


The following steps will show you how to check out a file using ProjectWise Edge Mobile, open the file using a third-party app such as Adobe Acrobat, make modifications, and check the file back into ProjectWise for access from other users.

Open ProjectWise Edge Mobile on the iPAD


Log into the Repository and browse to the file you want to markup. Remember the third-party app you will be using must be able to open the file format. Is this example, the third-party app is Adobe Acrobat for reviewing a PDF file. Press on the document until the context menu appears and choose Check out.


You will see a red check mark next to the filename indicating the document has been checked out.


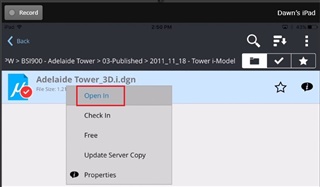
Press on the file until the context menu appears and choose Open In.


You will be presented with a list of apps on the iPad that can read the specific document format. In this example, choose Copy to Adobe Acrobat.


The document will now open in the third-party app. Make the modifications and Save the file.


The third-party app should have an Open In icon or a similar option for copying the file into another app. Adobe Acrobat has this icon in the lower right (box with arrow).


You will be presented with a list of apps on the iPad, choose Copy to ProjectWise.


You will get prompted to Update the file.


Once the file is updated, press on the file until the context menu appears and choose Check In.


You will not see the markups in the ProjectWise Edge preview but you can open in the original app you made the modifications in and you will see the markups. Once the document is updated and checked in, the changes can be viewed in ProjectWise Explorer or ProjectWise Edge Desktop.


1 - ProjectWise Edge Getting Started

$
0
0
Current Revision posted to Content Management Wiki by Jesse Dringoli on 10/4/2017 8:50:05 PM

This guide is designed to familiarize you with ProjectWise Edge. The Getting Started section provides general information to help you get started with ProjectWise Edge. If you are looking for more details on other topics, refer to the other sections for more information.

2 - Repositories

$
0
0
Current Revision posted to Content Management Wiki by Jesse Dringoli on 10/4/2017 8:51:39 PM

Files are stored in repositories for ease of access and efficient file management. On the Repositories screen, ProjectWise Edge displays a list of available repositories and shortcuts. Double click a repository or shortcut to access it.

Connecting to a Repository

From the Repositories screen, you can also connect to a new repository.

Personal Share

Bentley provides a location for each CONNECTED User called the Personal Share, which you can access from ProjectWise Edge. For more information, see the Using Personal Share topic.

Shortcuts

You can create shortcuts in ProjectWise Edge to quickly access files in repositories.

3 - Working with Files

$
0
0
Current Revision posted to Content Management Wiki by Jesse Dringoli on 10/4/2017 8:52:26 PM

ProjectWise Edge supports basic operations with files and folders such as creating folders, deleting items, and copying files. You can manage many types of files, including i-models, images, videos, SpecWave files, PDFs, and more. You can upload and import files using ProjectWise Edge and then manage changes made to the files using check-out, check-in, versioning, and synchronization. Using Properties, Search, Sorting, Favorites, and Folders make it easy to find and work with files.

4 - Workflows

$
0
0
Current Revision posted to Content Management Wiki by Jesse Dringoli on 10/4/2017 8:59:17 PM

A workflow is an ordered group of milestones, or states, through which a document passes on its way to completion. When a document completes a milestone, the user working on the document sends it to the next state in the workflow. Users with access to that next state can then begin working on the document. The process continues until the document passes through all states in the workflow and is considered to be finished. Then the document can be placed in final status to indicate that the document has reached the end of the workflow. Documents in final status are read-only, to prevent anyone from further modifying the document.

ProjectWise documents that are in a workflow and a specific state can be reviewed in a CONNECTED Project using ProjectWise Edge. Documents can be moved to the next or previous state and can be placed in final status.

5 - Forms

$
0
0
Current Revision posted to Content Management Wiki by Jesse Dringoli on 10/4/2017 9:02:26 PM

Projectwise Edge offers custom designed forms which you can submit to your ProjectWise repository. Forms are created using ProjectWise Field Data Management. For more information contact your project administrator.

Once forms have been created for your project, you can review and complete forms in ProjectWise Edge.

6 - Issues


7 - Compatibility Matrix Mobile Applications

$
0
0
Current Revision posted to Content Management Wiki by Jesse Dringoli on 10/4/2017 9:03:10 PM

This document compares the capabilities of each ProjectWise product, allowing users to review which application is best for their user persona.

**Please note as new features are released this document will be updated.

There are three basic user personas:

  • Office Based users are personnel such as Project Engineers, Designers, BIM Practitioners, etc. These users typically work with MicroStation, Bentley vertical applications, Autodesk vertical applications such as Civil3D, Revit, etc. as well as managed workspaces.
  • Visits the field users, such as Project Managers, Project Executives, Design Leads, etc., are often on the go. These users need to review files whether in the Office Site or in the Field.
  • Lives in the field users, such as Sub-consultants, Supply Chain Leads, Project Engineers, Field Personnel, etc., are always in the field. These users only need to create issues and review .pdf files and documents. Lives in the field users who are not familiar with ProjectWise-centric workflows should use ProjectWise WorkSite. However, if the Lives in the field users are familiar with ProjectWise-centric workflows, then ProjectWise Edge Mobile and ProjectWise Edge Client will fit their needs best. 

The document is available from the following link:

(Please visit the site to view this file)

Photo Application Associations for Windows 10

$
0
0
Current Revision posted to Content Management Wiki by Dana Guthrie on 10/17/2017 7:50:31 PM

 Product(s):ProjectWise Integration Server
 Version(s):10.00.02.265
 Area: ProjectWise Administrator
 Subarea: Application Configurations
 Original Author:Dana Guthrie, Bentley Technical Support Group

Background

User wants to create an Application in PW Admin to set images to use the "Windows Photo Viewer" for their Windows 10 computers.

Steps to Accomplish

Using the "Launch Windows App" association

If the "Launch Windows app" is not restricted on the machine, you can run through the 'Windows app launcher'. 

Follow these steps for global setting

  1. If the "Launch Windows app" is not restricted on the machine, you can run through the 'windows app launcher'.
  2. In ProjectWise Administrator, double click the Applications node,
  3. Double click on 'Images'
  4. Choose the actions tab
  5. Click Create,
  6. Set the action to 'Open',
  7. Click the browse button next to program class name, choose "Launch Windows App" click okay,
  8. Provide a program description, click okay, and okay

For individual user association:

  1. Have the user launch PW explorer and log in
  2. Right click an image file, and choose open with
  3. In the program list choose "Launch Windows App" click okay
  4. On the next dialog check the box to "always use this program".

Using the command line path location

If the "Launch Windows app" is not available then you can set the program associations using the C:\Windows\System32\rundll32.exe as the Program executable path and C:\Windows\System32\rundll32.exe "C:\Program Files (x86)\Windows Photo Viewer\PhotoViewer.dll", ImageView_Fullscreen %1 as the command line that will be used to start the application.

Follow these steps for global setting 

  1. In ProjectWise Administrator, double click the Applications node,
  2. Double click on 'Images'
  3. Choose the actions tab
  4. Click Create,
  5. Set the action to 'Open',
  6. Click the browse button next to program class name, Click the Executables tab, Click the browse button and navigate to C:\Windows\System32\rundll32.exe
  7. Choose Absolute or Relative Path then click okay
  8. In the Command Line Arguments field enter:  "C:\Program Files (x86)\Windows Photo Viewer\PhotoViewer.dll", ImageView_Fullscreen %1
  9. Provide a program description, click okay, and okay

For individual user association:

  1. Have the user launch PW explorer and log in
  2. Go to tools \ associations \ Programs
  3. In the associations list change the association view to "User Associations"
  4. Find and expand Images in the list
  5. Click the Open node to get the application window then browse again to C:\Windows\System32\rundll32.exe click okay
  6. Expand the command line arguments and enter the following then click Add and Okay.

"C:\Program Files (x86)\Windows Photo Viewer\PhotoViewer.dll", ImageView_Fullscreen %1

See Also

The Projectwise Administrator Help (search for dmsconv)

Increasing your Automated File Processing Power

$
0
0
Current Revision posted to Content Management Wiki by Marty.Nickel on 10/27/2017 1:29:10 PM

  
 Applies To 
  
 Product(s):ProjectWise Automated File Processing
 Version(s):08.11.11.123+ with a dedicated Tail Server
 Operating System: ProjectWise Indexing Server Requirements per Readme
 CPU: Minimum of 4, recommend 8
 RAM: Minimum of 8gb, recommend 16gb
 Original Author:Marty Nickel


Overview:

This technote will describe how to add additional processors to increase Automated File Processing for ProjectWise.  Please take note of the minimum requirements above, this will not work properly and is not supported unless the minimum requirements are met.

Please make a backup of your Orchestration Framework database before following this technote.  This will allow you to scale back to the original configuration in case this does not work out for you.  If it does not work for you, just restore the original database over the newly configured database.  

In order to get the processing to work as fast as possible, please follow this blog on how to properly configure the Full Text Indexing values in your ProjectWise Administrator:

http://communities.bentley.com/products/projectwise/content_management/b/weblog/archive/2012/08/08/optimizing-automated-file-processing.aspx

The AFP-multiple-processors.zip file can be found here.   There are instructions as well as notes inside of the file:

ProjectWise v8i:

http://communities.bentley.com/products/projectwise/content_management/m/mediagallery/269773.aspx

ProjectWise CE:

https://communities.bentley.com/products/projectwise/content_management/m/mediagallery/272827

Setup:

  1. Stop Orchestration Framework on your head and tail server
  2. Run this query on your Orchestration Framework database to check how many processors you have and to make sure the server name is right: select * from orchShepherdProcesses
  3. Edit the @MachineName value in one of the attached sql scripts to represent your Tail server
  4. Run whichever sql script you would like to use after editing the @MachineName value
  5. Start your Orchestration Framework Administrator
  6. Start Orchestration Framework on your head and tail
  7. Manually map the new processors by dragging the nodes from the left pane into the editor window in the Orchestration Framework Administrator to represent the picture below. This is an example of FTR.
  8. After manually mapping the processing should resume.

Notes:

After testing it appears that adding one extra set of processors to bring it up to two sets of processors is the best approach, three total sets have been attempted on some servers and some work but some it tended to max the server's resources out and make it unresponsive.  It is your choice if you would like to go above 2, but be warned.  Also when upgrading you will want to start with a fresh Orchestration Framework database since this does not convert over when doing the upgrade, after your upgrade please feel free to run the scripts again.  Please let TSG know if you have any questions on this technote.

Tags: ProjectWise, ProjectWise Integration Server

Unable to see datasources on Windows 10

$
0
0
Revision 3 posted to Content Management Wiki by Dana Guthrie on 10/31/2017 2:22:35 PM

 Product(s):ProjectWise Administrator
 Version(s):08.11.11.590
 Area: ProjectWise Administrator
 Subarea: Application Configurations
 Original Author:Dana Guthrie, Bentley Technical Support Group

Problem

I am unable to see the datasources from my windows 10 workstation using ProjectWise Administrator SS4 08.11.11.590

Solution

ProjectWise Administrator and ProjectWise Explorer SS4 version(s) are not supported on Windows 10 operating system.

To be able to see the ProjectWise datasources on a SS4 08.11.11.590 server:

  1. Uninstall all ProjectWise SS4 software from the client machine (Explorer and Admin)
  2. Install the ProjectWise Connect Edition 10.00.01.67 version of both the Explorer and Admin.
  3. When you launch ProjectWise Admin connect edition and login to an older (SS4) datasource, you will be prompted with a message:
  4. "The server you are connecting to is running a different version of ProjectWise.  ProjectWise Administrator only supports connections to the Matching version of ProjectWise Integration Server.  If you proceed, full administrative capabilities may not be available."  This just means that any new capabilities that may be in the connect edition will not work with older datasource.
  5. Click okay to the message. 

Note: You cannot mix versions of ProjectWise on a single machine.  In other words you can not have PWE SS4 installed with PW admin Connect edition.  Explorer and Admin must be of the same version.

**The recommended solution would be to remote into the V8i Integration server and use the ProjectWise Administrator on that machine.  Or create an "administrator box" with the supported operating system with the matching version of ProjectWise Administrator as is on the server, and then remote into that box when you need to perform administrative tasks.

See Also

Using Fetch Files to Pre-populate File Cache [TN]

$
0
0
Current Revision posted to Content Management Wiki by Bill Kenney on 11/9/2017 1:07:39 PM

  
 Applies To 
  
 Product(s):ProjectWise
 Version(s):2004, XM, and V8i
 Environment: N/A
 Area: N/A
 Subarea: N/A
 Original Author:Bill Kenney, Bentley Technical Support Group


Overview

ProjectWise provides the ability to temporarily cache files on ProjectWise Servers. This temporary caching allows for optimized performance when opening files. This technote will describe how to distribute a group of files or folders, to a large number of Caching Servers using the FetchFiles command.  The Fetch Files executable is a command line program that provides a way to pre-populate the cache from the specified storage area into a directory on the Caching Server.  This is useful if there are certain documents stored in a central location that are used by a particular set of remote users.  Either folders can be fetched, or use of the FetchFiles command with individual documents can be done.  The FetchFiles command would have to be run from each Caching Server targeted to store the temporarily cached folders and files.

Pre-Requisites

This tech note assumes the reader is familiar with the running command line programs and ProjectWise File Caching. For more information on File Caching, see the ProjectWise Administrator Help.

FetchFiles Set up:

1. File caching must be configured on the ProjectWise Caching or Gateway server. Below is a simple example of how to configure File Caching. In this example, files from the Integration server will be cached on the Caching server. Clients will be configured to retrieve files from the Caching server.

  • Using notepad, Open the c:\ Program Files\Bentley\ProjectWise\bin\dmskrnl.cfg file on the Caching
    Server (See Caching Server B in network example in Figure 1). In the General Server Configuration Information section, make sure that “FileTransferSrv=1” is uncommented. (remove the semicolon in front of the line)

    Example

    FileTransferSrv=1


  • In the Gateway section: Add this entry <Integration Server name>=<Caching Server name with no
    semicolon in front of the line.

    Example

    Integration Server A=Caching Server B


  • In Routing Section: Add this entry <Integration Server>=5800 with no semicolon in front of the
    line

    Example

    Integration Server A=5800


  • The following configuration turns on file caching, provides a path to where the files are temporarily stored, and sets a limit of disk space to be used in megabytes. In the area labeled “[Cache]” Remove the semicolons in front of the following lines:

    [Cache]

    enabled=true

    storage path=C:\cache

    limit=200


2. On the machine where fetchfiles will be run, update the ProjectWise Network Configuration settings to point to the Caching server configured in step 1. This can be done in the ProjectWise Network Utility found in the Start Menu > Control Panel.

  • On the Datasource Listing tab, populate the Caching Server name and the Host/IP name > add
    Port 5800.
  • Do the same on the DNS tab.


3. In Windows Explorer, on the Caching server, create a temporary Working directory (PWork for example) different from the ProjectWise Storage area (or any temporary Caching directory). This directory will act as a temporary holding place for the Fetchfiles before they are placed in the Caching directory.


4. Use the FetchFiles command to collect the desired files from the Datasource. See examples below.


There is additional helpful reading on FetchFiles in the ProjectWise Administrator “Help” section on File Caching.

FetchFiles options:

         -d  ;the name of the Datasource you are fetching files or folders from
         -u  ;the username given (typically with administrative permissions) that fetchfiles will use to log into the Datasource.
         -p  ;password of the username
         -w  ;This switch is required.  Provides the path to the fetchifles working directory
          -v   ;Verbose logging.  Describes what is happening as the command executes.
          -f   ;Set this switch before the path to the file you want to cache.  The -f tells FetchFiles to treat it as a document instead of a folder
          -n ;This option turns re-cursing off for the path that follows.  If no option is specified , -n is assumed by default

          -r  ;If you want the Fetchfiles utility to re-curse the specified folder (that is, to look for files in the subfolders of the specified folder), then enter the -r option

               before entering the path

Examples

    The following is an example of a command line for fetching a folder called “Archive” from the Datasource called “TSG-Play” on a server called “neo”.  Once the files are fetched they will be placed in the temporary caching directory as configured by the dmskrnl.cfg file
C:\Program Files\Bentley\ProjectWise\bin>fetchfiles -d  neo:TSG-PLAY -u admin  -p admin -w C:\PWork  -n  Civil\BPlans\Archive  -v

     The following is an example of a command line for fetching a document called “2004master” from  a  Datasource called “TSG-Play”, from a server called “neo”, and from a folder called Nextlevel.
 C:\Program Files\Bentley\ProjectWise\bin>fetchfiles -d neo:TSG:Play -u admin -p admin -w  C:\PWork -n\XFolder\Nextlevel -f \Bill\Nextgen\2004master.dgn

See Also

Product TechNotes and FAQs

External Links

Bentley Technical Support KnowledgeBase

Bentley LEARN Server

Comments or Corrections?

Bentley's Technical Support Group requests that you please confine any comments you have on this Wiki entry to this "Comments or Corrections?" section. THANK YOU!


Tags: TechNote, ProjectWise SELECTsupport, Caching, FetchFiles

Integration with FME

$
0
0
Revision 1 posted to Content Management Wiki by Inga Morozoff on 11/9/2017 2:45:45 PM

Exporting MicroStation DGN files to one of the many formats supported by FME can be achieved by selecting FME Quick Translator from the Open With option.

The workflow is illustrated in the following video.

(Please visit the site to view this video)

ProjectWise Edge - Mobile

$
0
0
Current Revision posted to Content Management Wiki by Ranveer.Basra on 12/11/2017 10:20:35 PM

ProjectWise Edge Mobile is a client for your iOS tablet or phone. This application provides the following functionalities. 

Version 05.05.12.14

  • Access ProjectWise Work Area Connections: ProjectWise Projects can now be configured on connect.bentley.com to automatically bring on-premise ProjectWise Work Area connection to the app automatically when a ProjectWise Project is selected.
  • Form Attachment with location: Adding an attachment to a form can now set a location from where that attachment was taken from.
  • Ability to clear locally stored data: Data that is cached can now be cleared via a button in the settings area. This will clear cache for shortcuts, manually created connections and favorited items.
  • Bug fixes

Version 05.05.06.35

  • Form Capability:
  • Single Sign On (SSO) Support for Bentley managed services:
  • ProjectWise Share Access
  • Multiple Language Support
    • Chinese
    • Traditional Chinese
    • Korean
    • Japanese
    • Spanish
  • Check out/In capabilities
  • Updates server copy
  • Free documents/files
  • Copy file
  • New folder creation
  • Deleting documents and folder
  • Importing documents

Version  05.05.04.50: Commercial Release 

  • Quick Access to CONNECTED Project Features
  • Access Workflows
  • Access Issue Resolution Punch List forms
  • Click on a CONNECTED Project link for direct access to CONNECT.BENTLEY.COM browser access
  • View Mapped view of Project location
  • Changes ProjectWise document States
  • Review documents in specific Workflow and States
  • Set Final Status on document
  • New UX Icon to show read-only and final status documents

*Rules Engine and BS1192 features not enabled YET! Coming Soon.

  • Share a pw:// link via email
  • Folder link: open to folder in ProjectWise Explorer Mobile
  • Document link: Prompted to open file with specific application on mobile device

Optimizing File Transfer Performance in ProjectWise Explorer

$
0
0
Current Revision posted to Content Management Wiki by Bill Kenney on 12/29/2017 2:41:05 PM

   There are settings to influence opening files with poor latency in ProjectWise, or optimizing performance opening files in ProjectWise.

     Some things you can consider are…

    Setting up a PW Caching server closer to the Users can help in a couple of ways.  You can set up storage of the files permanently closer to the users in an office far from the ProjectWise Integration Server.  Also, you can setup ProjectWise Temp Caching where the file is Cached after the first download from the ProjectWise Integration server \remote storage by the User in the ProjectWise Cache Server. 

      Can enable (this is on by default) Delta File Transfer to only download the "changes" in the file vs the whole file.

      Can enable (Datasource setting) "Compress client\server request data"

      Enable "Leave Up-to-Date" Local Copy on Checkin, Checkout, Free (See attached screen shot for different settings and descriptions of settings). 

      Can enable File Streaming for very large raster and\or Point Cloud on the PW Caching\Integration Server (whichever server storage has the Point Cloud files stored)

      You can change the action for Titleblock update conditions (like manually Update the Titleblocks vs upon Checkout, Copy Out, or Open)

      Can simplify how many attributes are displayed in "Views"

       Can simplify security, by minimizing how many file\folder\workgroup security settings that gets captured in the Audit Trail.

      Settings Descriptions below are in PW Admin module > Top Menu Help > Contents > Index Tab > User Settings > Network  

The above and below settings have a Server setting in the PW Admin module > right click on Datasource > settings tab   and in addition, there is the PW Admin > Users node > right pane > highlight all users > right click > Properties > Settings tab

The below screen shot is from the PW Admin module > User Node > Right click on specific User in right pane > Properties > Settings tab > Document node

The description of the PW Admin > User settings is below (from the PW Admin “Help”)

     You may Monitor and Analyze your ProjectWise system with performance counters - see link below:

https://communities.bentley.com/products/projectwise/content_management/b/weblog/posts/monitoring-and-analyzing-your-system-with-performance-counters

Tags: explorer, ProjectWise Administrator, ProjectWise

ProjectWise Sync Service

$
0
0
Current Revision posted to Content Management Wiki by Raul Guerrero on 1/2/2018 10:37:03 PM
For articles on this subject, see the Table of Contents on the left or use the search bar above.

Configuration - ProjectWise Sync Service

$
0
0
Current Revision posted to Content Management Wiki by Raul Guerrero on 1/2/2018 10:37:03 PM
For articles on this subject, see the Table of Contents on the left or use the search bar above.

ProjectWise Sync Service - User is unable to force a refresh with his user account

$
0
0
Current Revision posted to Content Management Wiki by Raul Guerrero on 1/2/2018 10:37:03 PM
 Product(s):ProjectWise Sync Service
 Version(s):10.00.02.18
 Environment:N\A
 Area:Configuration
 Subarea:N\A

Problem

The issue is once the user logs in with their ProjectWise admin account, they cannot refresh and update the sync service.
 
Yet, if he logs in with his colleague’s credentials, he is able to force a refresh and it works.
Both users have the same security assigned to their account.
 
When user starts the refresh the status column displays in red Refresh failed.
When he logs in with his colleague’s credentials, the status column displays in green – Success.


Solution

Ensure the user has access to the project they are trying to refresh in the cloud. If they are still not able to refresh, right click and run as admin.
Start the application as administrator – run as.
This solved the issue


See Also

XXXXXXX(Add more links as needed for other relevant Be Communities content.)XXXXXXX


Tags: 10.00.02.18, ProjectWise Sync Service, ProjectWise, en, Configuration

tst 99999

$
0
0
Current Revision posted to Content Management Wiki by marion powell on 1/3/2018 3:05:46 PM
 Product(s):ProjectWise Explorer Client
 Version(s):10.00.02.96
 Environment:N\A
 Area:N/A
 Subarea:N\A

Problem

XXXXXXXProblemXXXXXXX


Solution

XXXXXXXSolutionXXXXXXX


See Also

XXXXXXX(Add more links as needed for other relevant Be Communities content.)XXXXXXX


Tags: 10.00.02.96, ProjectWise, en, ProjectWise Explorer Client
Viewing all 1890 articles
Browse latest View live


<script src="https://jsc.adskeeper.com/r/s/rssing.com.1596347.js" async> </script>